File share
The file share function allows you to use your router's external storage to share files with anyone on the internet. Simply attach a USB, nVME or any supported drive to your device, and then add whole directory paths to the fileshare menu. The router will use the MikroTik cloud service to issue an HTTPS certificate and a domain name for your router. The URL which you can then distribute to anyone will be shown in the file-share menu. You can also enable the ability for anyone to upload files into your router. The URL is randomly generated, so while it is available to anyone who knows the link, if you keep it safe, only people with the link will be able to use it.
Adding shares
First, attach your USB drive and determine the file path of the directory you want to share:
[user@RouterOS] > /file/print
 # NAME                                                                           TYPE             SIZE LAST-MODIFIED
 0 web                                                                            directory             2025-01-23 09:29:42
 1 usb1                                                                           disk                  2025-01-22 09:45:57
 2 pub                                                                            directory             2025-01-23 09:24:41
 3 skins                                                                          directory             2024-12-10 08:19:27
 4 pub/index.html                                                                 .html file        670 2025-01-23 09:24:41
 5 skins/default.json                                                             .json file        151 2024-07-15 10:20:11
 6 usb1/Secret Files                                                        	  directory             2024-03-18 09:01:41
 7 usb1/forum                                                                     directory             2025-01-22 10:58:20
 8 usb1/Secret Files/Home Video.srt                 							  .srt file         267 2020-06-01 11:29:14
 9 usb1/Secret Files/Home Video.mp4                 							  .mp4 file   1584.4MiB 2020-06-01 11:34:33
10 usb1/forum/cat.jpeg                                                            .jpeg file  4307.7KiB 2025-01-22 09:38:55
11 usb1/forum/cat1.jpeg                                                           .jpeg file   231.8KiB 2025-01-22 10:58:20
12 usb1/forum/cat2.jpeg                                                           .jpeg file   129.6KiB 2025-01-22 10:58:20
13 usb1/forum/cat3.jpeg                                                           .jpeg file   263.8KiB 2025-01-22 10:58:20
14 usb1/forum/cat4.jpeg                                                           .jpeg file   438.4KiB 2025-01-22 10:58:20
15 web/index.html                                                                 .html file       1473 2025-01-23 09:29:42
Navigate to /ip/cloud/back-to-home-file. When sharing a directory, you must specify the path and expiration date, and may also grant upload permissions. When sharing a file, only the path and expiration date are required.
[user@RouterOS] /ip/cloud/back-to-home-file> add path=usb1/Secret Files/ expires=never allow-uploads=yes
[user@RouterOS] /ip/cloud/back-to-home-file> add path="usb1/Secret Files/Home Video.mp4" expires=never
Now you can issue the print command to see if the share link has been made and what the URL to copy for sharing is:
[user@RouterOS] /ip/cloud/back-to-home-file> print
Columns: PATH, URL, DIRECT-URL, EXPIRES, DOWNLOADS
# PATH                      URL                                                        DIRECT-URL                                                    EXPIRES  DOWNLOADS
0 /usb1/Secret Files  https://acf017skgys.routingthecloud.net/s/4MPgHbEZCZYGVtp  https://acf017skgys.routingthecloud.net/s/4MPgHbEZCZYGVtp?dl  never            5
1 /usb1/Secrets      https://acf017skgys.routingthecloud.net/s/K8zkh1UjKuqtEQ0  https://acf017skgys.routingthecloud.net/s/K8zkh1UjKuqtEQ0?dl  never            2
[user@RouterOS] /ip/cloud/back-to-home-file>
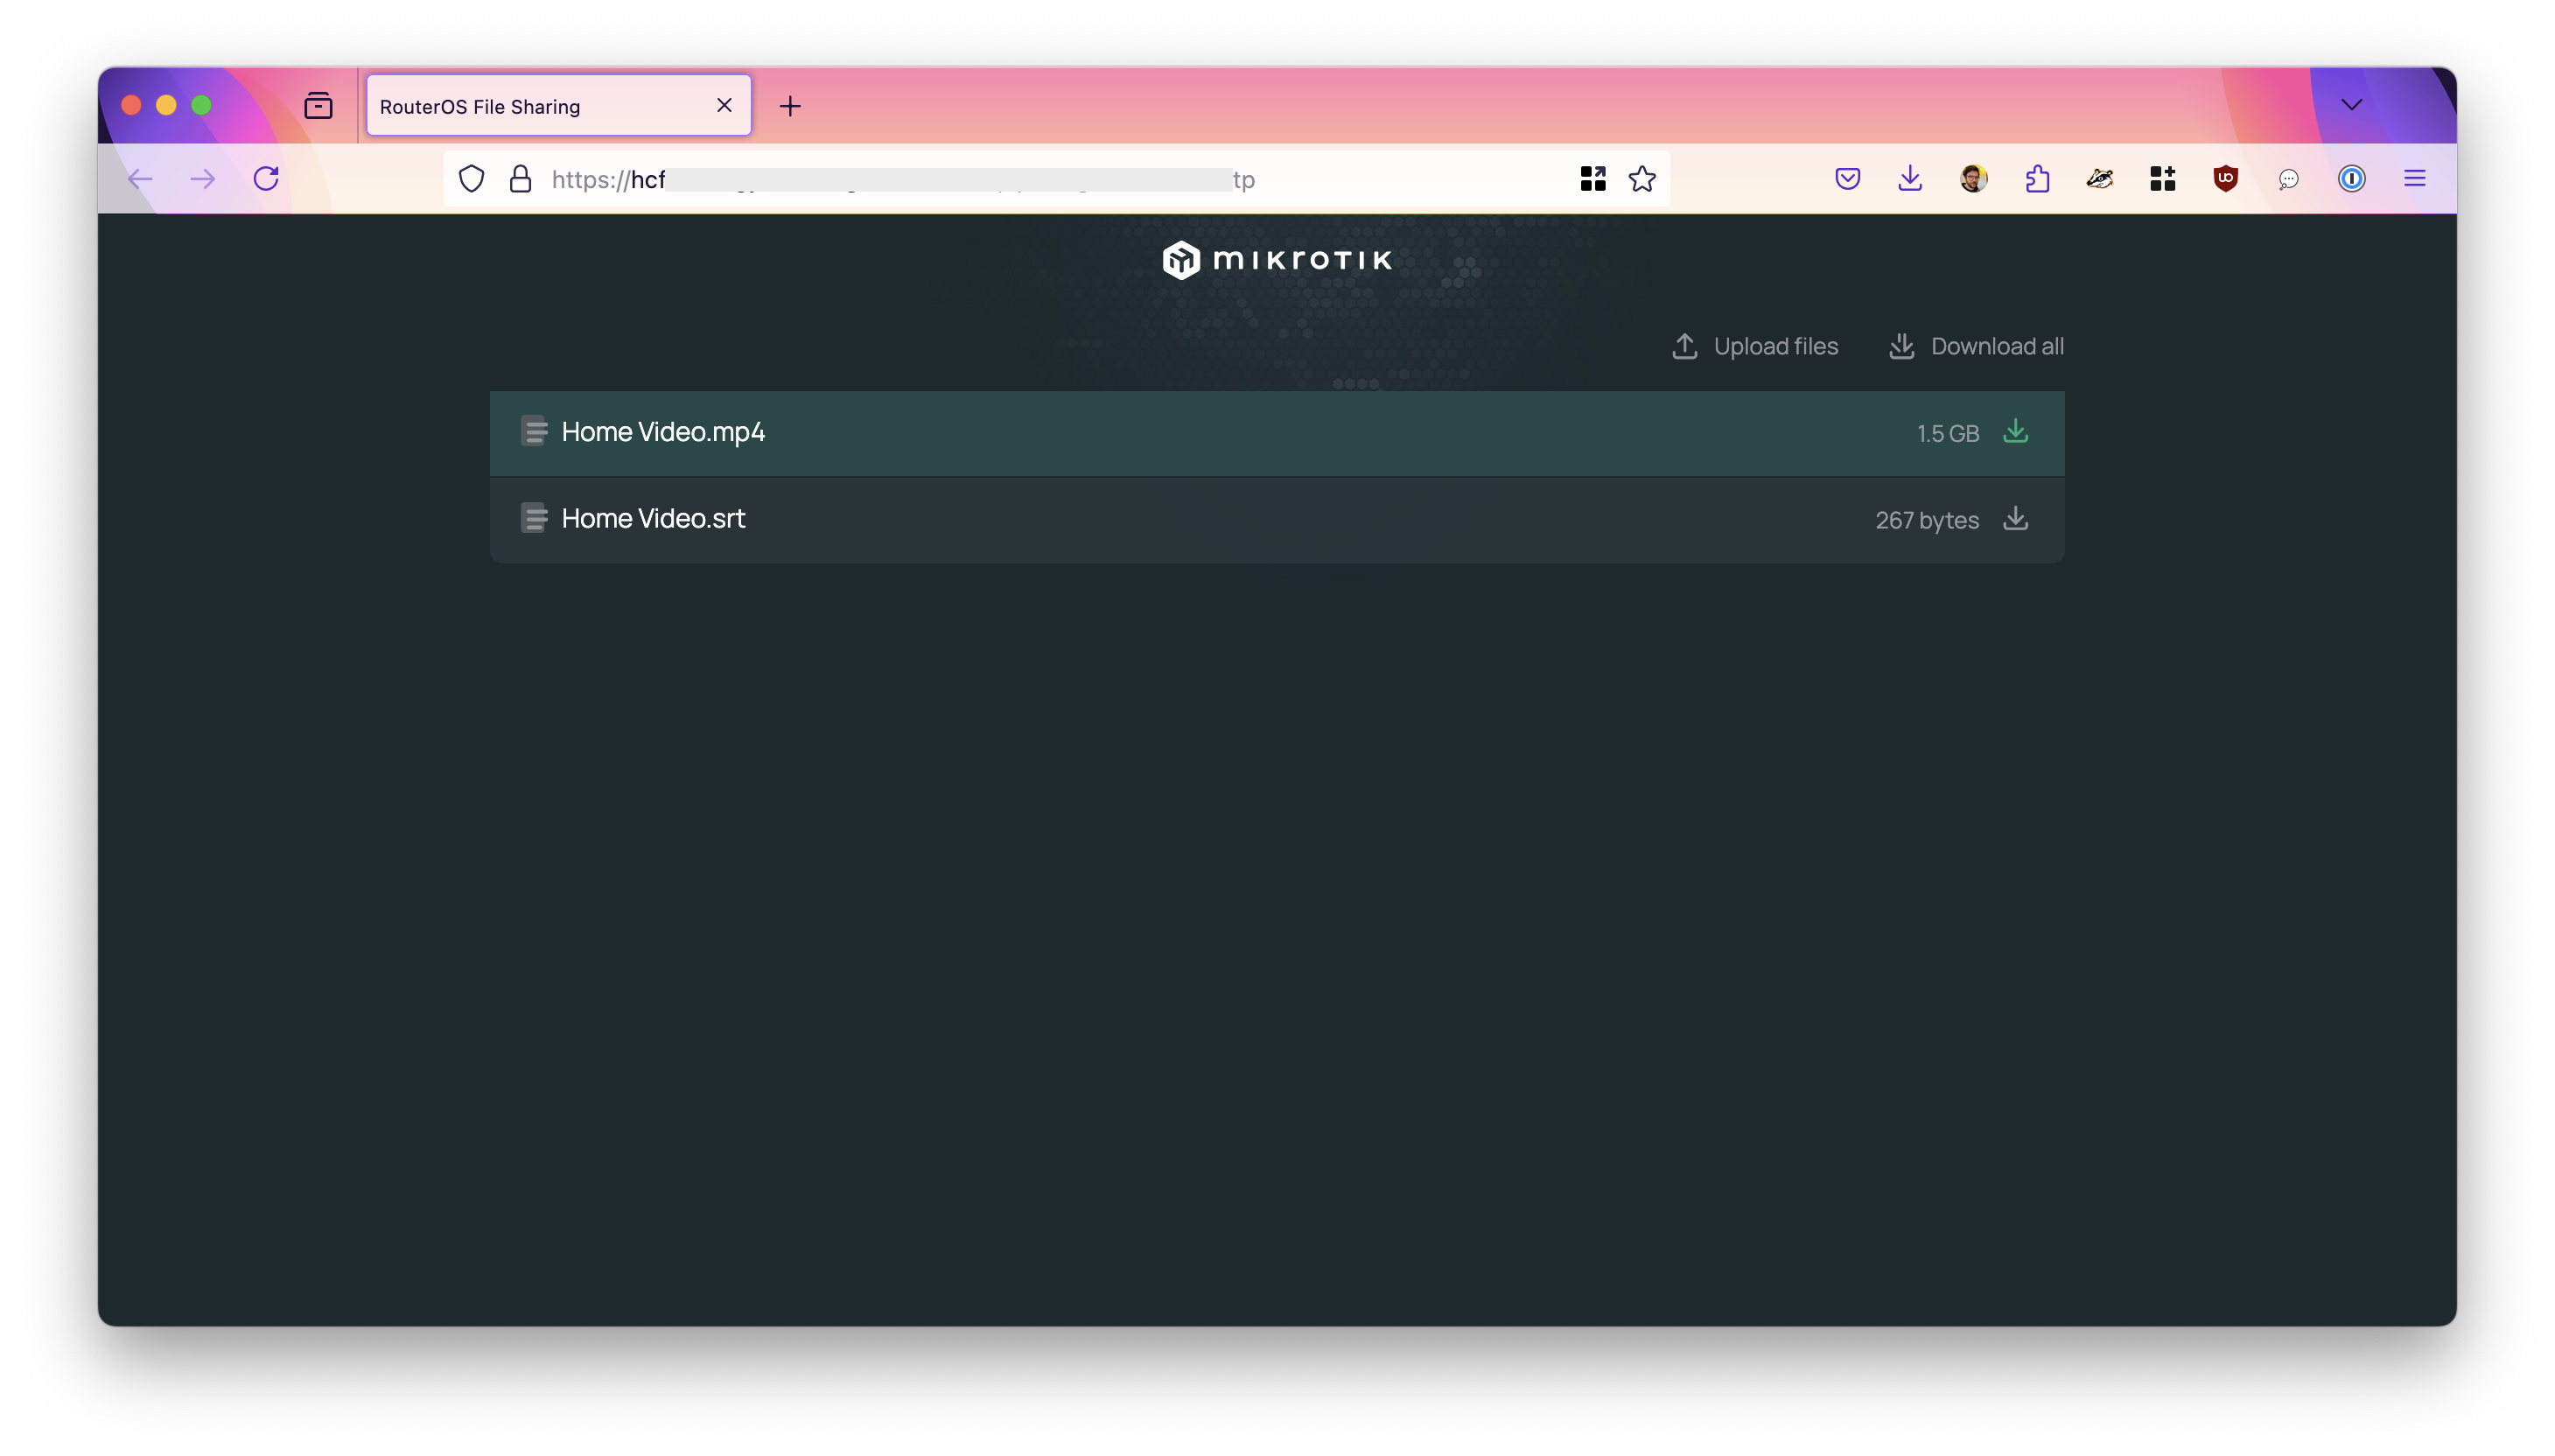
Now, if you copy the "URL", you can share it with other people, regardless of where they are located, and regardless of whether your router has a public IP or not.
When you send the URL to a friend, they can then see all the files in the shared directory and can download them. If you enabled uploads in the share creation process, they can also upload files into your router. Keep this URL safe, or specify an "expires" date to avoid other people accessing these files.
| Property | Description |
|---|---|
| enable (Default) | Enables the File Share function. The File Share service will be activated when the first share is added. If no shares are present, the File Share service remains disabled. |
| disabled (*yes | no;*Default: no) | Disables the File share function. |
| allow-uploads (*yes | no;*Default: no) | Enables the option for anyone to upload files to your router. |
| expires (Default: never) | Share expiration date. Format: ISO 8601 (2025-01-25 00:00:00) Example: /ip/cloud/back-to-home-file/set 0 expires="2025-01-25 07:15:00" |
| path | Sets the path for the file to be shared. Example: "/ip/cloud/back-to-home-file/add path=mypath/myfile" |
WinBox GUI
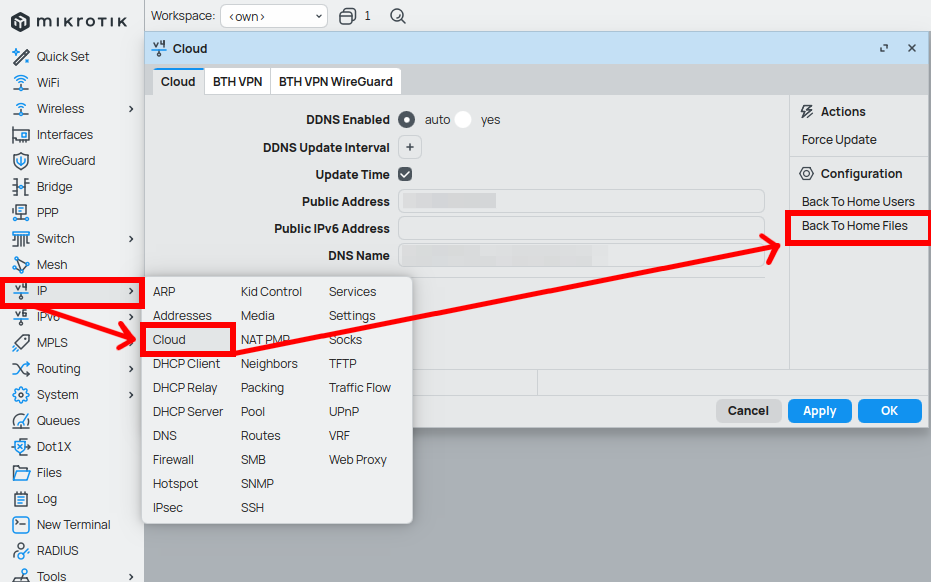
To share the file, access the "File Shares" menu located under the IP → Cloud "Configuration" section.
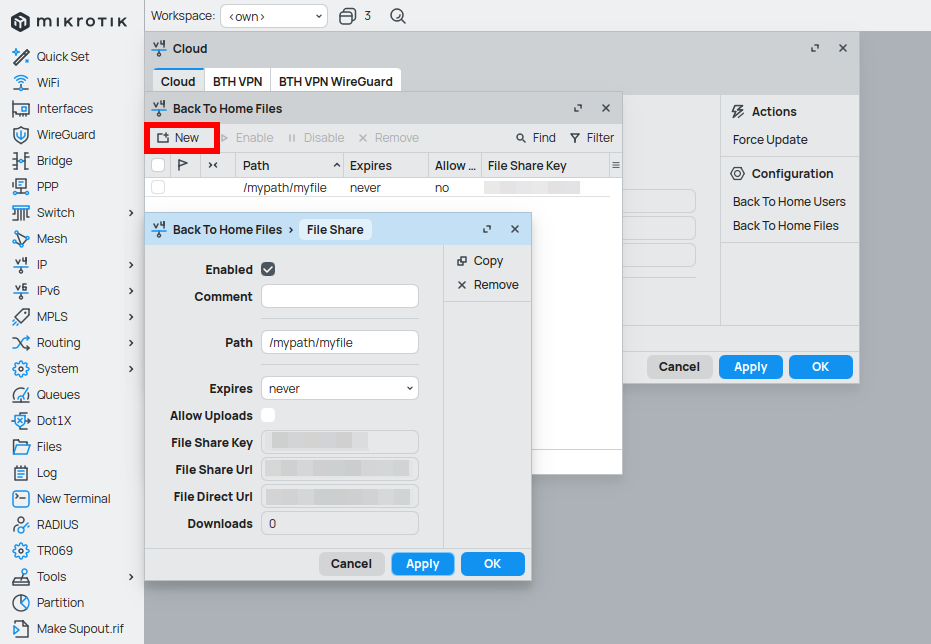
To create a new share, set the "Path", "Expires" and "Auto uploads" options.
[admin@MikroTik] > /ip/cloud/back-to-home-file/print detail
Flags: X - disabled; I - invalid
 0    path=/mypath/myfile allow-uploads=no expires=2025-01-25 07:15:00 key="*********"
      url="https://*********.routingthecloud.net/s/*********" direct-url="https://*********.routingthecloud.net/s/*********"
      downloads=0
Security warning
The URL is randomly generated, so while it is available to anyone who knows the link, if you keep it safe, only people with the link will be able to use it.
File share uses HTTPS (TCP port 443), but if you have manually configured WebFig to also use HTTPS, File Share will then automatically work only through our cloud relay service, since there can not be two things using the same port in one device. By default www-ssl is not enabled, so File Share works directly by default, without using the relay for downloads. Enabling file share will not in any way affect your WebFig configuration and will not open it to the world.
In the case of the File Share feature, when a user wants to share a file with somebody, this is the order of operations, if your router is directly accessible from the internet (checked by the Relay server):
- Router locally generates a private key and certificate.
- Signing of the certificate is performed on the router using the standard ACME protocol (using DNS-01 challenge with LetsEncrypt backend).
- DNS-01 challenge is sent to the MikroTik cloud DNS server, by temporarily adding a DNS TXT record (standard procedure).
- DNS name resolves to the router.
- Secure 443 port is opened with the private certificate.
Relay service
If the device is not directly accessible from the internet, it will choose to use the MikroTik hosted Relay service.
- Router checks its reachability from the Internet.
- If a relayed connection is needed, then DNS is updated to the relay IP.
- Router picks the closest relay based on latency.
- If the router uses the relay, then the connection is kept open with the relay. yyyyyy.routingthecloud.net resolves to the relay. When the client makes a connection via relay, then TLS Client Hello is parsed to get the destination router and the whole HTTPS request is forwarded directly to the router.
- Relay has no way of decrypting your data, because the certificate with the private key is on the router only.